#jsddm { margin: 0; padding: 15px; z-index:1000000000; position:relative; } #jsddm li { float: left; list-style: none; font: 12px Tahoma, Arial; } #jsddm li a { display: block; white-space: nowrap; margin:1px 3px; border: 1px solid #AAAAAA; background: #cccccc; background: -webkit-gradient(linear, left top, left bottom, from(#ebebeb), to(#cccccc)); background: -moz-linear-gradient(top, #ebebeb, #cccccc); padding: 5px 10px; -webkit-border-radius: 5px; -moz-border-radius: 5px; border-radius: 5px; text-shadow: #ffffff 0 1px 0; color: #363636; font-size: 15px; font-family: Helvetica, Arial, Sans-Serif; text-decoration: none; vertical-align: middle; } #jsddm li a:hover { background: #C8C8C8; } #jsddm li ul { margin: 0; padding: 0; position: absolute; visibility: hidden; border-top: 1px solid white; } #jsddm li ul li { float: none; display: inline; } #jsddm li ul li a { width: auto; background: #CAE8FA; } #jsddm li ul li a:hover { background: #A3CEE5; }

The Blogger

My photo
Philippines
I am a simple person who lives a complicated life; the irony makes my life interesting. I have a curious mind and I am always ready to be inspired. I like to be more informative and empowering and that's what I really want to bring out from my blog. "Anything and Everything" is the theme of my blog. I will incorporate information and empowerment in any sort of topic.

My Online Store

Showing posts with label do-it yourself. Show all posts

Sunday, February 19, 2012

Customized Shoes

This is just a repeat or a some-what a-like to my Vday post... I promised to feature about making customized shoes - so I did customized shows for the Vday. I think it would be a unique gift to my boyfie hubsy for the Vday.

Things you need:

1. Canvass shoes
          - There are variety of types of canvass shoes you can chose from, it just depends on your type, and of course the design must fit the shoes. If you want to long cut shoes (like Converse's Chucks) then you will

Friday, January 20, 2012

Organizing & Recycling (DIY)


What do you do on a day off? Today, I tried to do something productive by organizing a corner of my room. I threw some of my old cosmetic stuffs, according the guidelines I wrote on my previous blog. I also threw a lot of papers (the useless ones like receipts, etc) for recycling. I bought an orange (I'm not sure of the exact shade but the sales lady said handed me this color when I said "orange") cartolina and plastic cover (like the ones we use to cover books), gathered some old boxes from shoes, etc and some old usable/recyclable stuffs and used my afternoon energy in doing my own DIY books and cosmetic organizers.

I spent only PHP80 or USD 1.8 for this project, and there are still many unused cartolinas and plastic covers I was able to keep for future use. It took me at least four hours in doing this.


For my small books, I used a large shoe box and covered it with the orange cartolina and plastic covering.


For the large books, I used a larger box and cut it with the front smaller than the back (for easy sorting).


For my miscellaneous stuffs cluttered on the table, I had it all put in a box which I covered with orange cartolina and plastic. I also had its top cover covered.
I kept my nail art stuffs in the wooden box.
I had my pen, pencils, markers, and wooden massage put on a mug which I do not use.


For my cosmetics, I threw the "expired without expiration date" base from my previous blog (The Dangers of Cosmetic Products) and kept those who are still in its "unexpired" state.
I had an old box utilized and had the bottom and top cover stuck side-by-side. I cut out cardboards of different sizes and connected them together to form squares or triangles which will be used for the division. I tried to cover the division cardboard with coloured papers but they just tore and made my project look ugly, so I decided to keep them bare - and fortunately they look okay! LOL.


For my accessories, I threw the old ones and remained some which I really really like. 
I put them on old ear budds containers. The necklaces were put on  an old rounds talc container.
I organized my headbands and sunglasses and put them on a old chocolate container which has a cylindrical shape.


 I know I threw a lot of my stuffs and only a few remains. My philosophy is to keep a few but those few are the essential ones. I don't think I need plenty of stuffs which are not that of much use to me - it will just cause more clutter. LOL. Anyway, I have the rest of the year to buy new ones.


Monday, January 9, 2012

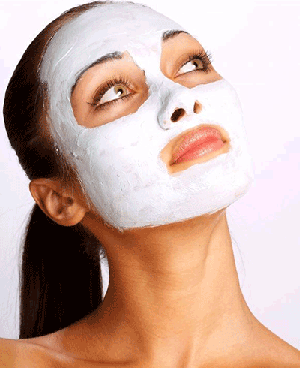
Do It Yourself Home Facial

I honestly haven't been to a dermatologist just for beauty care purposes. The only time I consulted a derma was when I panicked after having a small 2nd degree burn on my face caused by a hot cooking oil when I was frying a nice pork dish. The dermatologist gave me a topical antibiotic and just told me to return if a scar mark will form.  It was years ago (I was still an adolescent), though, and fortunately the scar did not leave a mark, so I did not return to the dermatologist. LOL.

So anyway, now that I'm a young adult, I always encounter my friends and workmates going to dermatologists and having facials. I'm really curious what facial is about, and if should I have one done for myself? My friends tell me that once you have facial done to your face, you should be able to maintain it and have it done every month. They tell me that it's painful since they sometimes have their pimples manually removed (or pricked). Facial nowadays is becoming cheap due to the growing competition among dermatologists and skin care centres. I guess it's just hard for me to find someone I can trust my skin with.

As for me, I've never had facial or any procedure done on my face before. Though I have pimple marks as remembrance of my very stressful college life, I don't really have any problem with my facial skin. So anyway, I decided to start taking care of my skin this year (that I should be conscious with my skin), and I wonder if facial will be healthy for me. I am a believer of natural beauty, so I decided to look for alternatives of facial (done one clinics), like do-it-yourself facial.


Materials:

Headband/ hair pins
Basins
Face Towels
Hot Water
Warm Water
Cold Water
Facial wash indicated for your skin type
Scrub / Exfoliant indicated for your skin type
Mask indicated for your skin type
Moisturizer indicated for your skin type
Cucumber


Here are the steps in the DIY Facial.


1. Have your hair clipped or controlled my headband to prevent it from going to your face or having it wet

2. Wash your face with your facial cleanser to remove make up and pollution, and dry with a clean towel

3. Pour hot water on a basin, and have your face steamed over it. You can put a towel at the back of your head, lean over over the basin at a comfortable distance from the water - this is to keep the steam focused on your face. The hot steam will open your pores.


4. Using a warm water, wash your face and apply the scrub or exfoliant. Massage your  face in a circular outward motion. A circular motion when massaging helps promote blood circulation on that area.

5. After thoroughly massaging your face (when you feel relax already), rinse your face with a warm water and dry with a clean towel.


6. Apply a mask on your face, let it stay for some time (according to the instructions written).

7. Rinse the mask with warm water.

8. Rinse second time using cold water, and dry your face. The cold water will close your pores


9. Apply your moisturizer

10. Find a place to lay down, close your eyes, and put cucumber on your eyes.

11. Have a nice music, relax, and feel your being beautiful


I already did these steps, and it really made me feel good after doing the procedure. The products I used were: St' Ives Appricot Scrub, Olay Facial Foam Cleanser, St. Ive's Face Mask, Olay Facial Moisturizer. I feel naturally relax and beautiful. Try it yourself!


Olay Facial Cleanser
St. Ives Appricot Scrub

St. Ives Facial Firming Mask

Olay Moistuzing Cream


Related Posts Plugin for WordPress, Blogger...